Switching from FreePBX to a Cloud VoIP System
The topic is fresh on our minds because we’ve done this particular migration 5 times in the last week and half! Let’s discuss a few of the tips & tricks we used for a seamless migration experience:
1. Plan the Cutover
- Questions you will want to ask & gather data for:
- Is the current model of desk phone connected to FreePBX compatible with the new cloud system?
- List the extensions, user names, and emails.
- Gather the DID list (known as Inbound Routes in FreePBX) and ensure you know the destination for each one.
- Check out call flow for any published numbers. This may include auto attendants (IVRs in FreePBX) or Ring Groups, Announcements, etc.
- What is the plan for the actual cutover – will you a) do some temporary forwarding while waiting for the DIDs to port, or b) plan to cutover on the actual day of porting?
- If ‘a’ above, how will you forward? Via the FreePBX? Or can you do it at the trunk level?
2. Export Data
FreePBX has built in modules that allow you to export data to csv files. The older versions called these modules “Bulk Extensions, Bulk DIDs, etc” while the new versions call it “Bulk Handler”. These lists should contain all you need to know about extensions and DIDs. In addition, you might be able to re-format the columns and directly import the spreadsheet to your new cloud system – saving boatloads of time! It’s also important to gather the recordings used in any public facing greetings & menus. FreePBX contains these recordings under Admin>System Recordings but you may have to use SFTP software to download the actual audio files.
It’s even possible to gather each extension’s voicemail greeting from the FreePBX system. They are saved in the /var/spool/asterisk/voicemail/default directory. We use Webmin to download the entire directory then upload the .WAV greeting for each user in our AtcomCloud system.
3. Program the Cloud VoIP Phone System
This step is pretty self evident. Hopefully you’re well versed in your cloud platform and can do this part with ease!
4. Deal with Desk VoIP Phones
If the existing phones are compatible with the cloud system, you can gather the MAC addresses from FreePBX “Endpoint Manager” (if used). Then you could re-provision the phones all at once using DHCP options or an equivalent process.
Otherwise you’ll likely be provisioning new phones and will have to decide whether both devices can sit on the desk at the same time, or whether you’ll have to switch them one at a time during the cutover. Considerations include available POE switch ports, data jacks available at each desk, room at the desk, etc.
5. Cutover
Usually, the best way to begin cutover is to get a new phone working at the reception desk or call taker area. If possible, keep an old and new phone running concurrently so users with either type of phone can be reached until the cutover is complete. Second, you’ll need to get incoming calls switched over to the cloud PBX. As mentioned previously, this is accomplished either through porting or with temporary number forwarding.
If using number forwarding, the preferred option is to forward calls with the previous carrier so they never even reach the FreePBX. However, as is the case with Shaw SIP Trunks for example, the old carrier may only have the option to forward all calls to a single number. Thinktel, in contrast, allows you to forward each DID to it’s own destination.
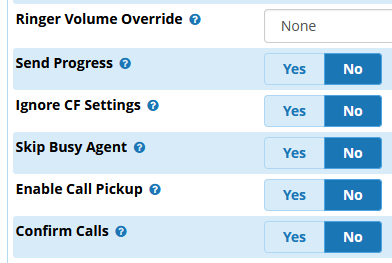
Alternatively, if you will be forwarding in the FreePBX, decide whether to use Ring Groups or Extension Follow Me to do the forwarding. In either case remember to put a pound sign # after the 10 digit number you are forwarding to! One other gotcha we discovered was that it seems to be important to turn off “Send Progress” in the FreePBX Ring Groups being forwarded. (see screenshot below) Leaving that option on seemed to inhibit DTMF recognition on the cloud system.
If you have questions about the process feel free to reach out to the Atcom support team!
Subscribe to our Newsletter for Updates and News


Proudly serving British Columbia, Alberta, Saskatchewan, & more
Headquartered in Calgary, supporting Canadian businesses
Atcom Systems is a Canadian leader in modern, efficient, and user-friendly solutions that meet the needs of clients in diverse industries and solve key communication challenges.